spring block swap is a flimsy!

i'm hiding in my sewing room from the trick-or-treaters. i'm the scruge who already ate forgot to get candy. so i decided to be the engergizer piecing bunny...i made bias binding (which i took pictures for a future tute) for 3 quilts, sewed one of those binding to my sister's choice quilt, i pieced 2 backings, and got borders sewn on a quilt. i'm not showing off, i swear- sunday's are my 'studio' day....it's rare that i get all day to piece, so i ty to get as much done as possible.

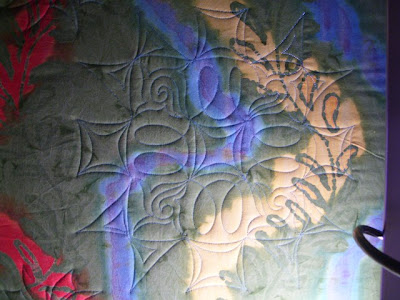
i also finished piecing my blocks from the spring swap into a flimsy (a flimsy is a patchwork top ready to be quilted). i've decided to name this quilt "Painted Flower Show". i had that large print leaf in my stash for a while. it was gonna be the border for another quilt, but i like it here much better....i like the idea of looking at all the names and places the blocks came from. thanks to those that participated! i love my quilt!

it's almost 9:00pm and i just realized i haven't eaten all day and i think i'll be safe going back upstairs...

happy halloween!

my kind of store!

i found 'my' type of online store: CLICK HERE

i love their tagline: making the world a softer world"

hot off the frame!

i just finished my sister's choice block swap quilt (which will probably get a name change) i am so super excited to share pictures....i'm really happy how it turned out.


thanks to all that participated! i love my blocks! 


detail of the border and block (don't forget- click on the picture for a larger pic, then click 'back' to come back to the blog)


detail of the block....i like the double 'L' loops in the center 9patch...quite pleased with that little creative spark

my favorite thing about this quilt is that even though i quilted every block with the same design, the thread blends into some of the batiks and contrasts in some so they look like they have all been quilted differently....i love the little surprises like that happen once a quilt is quilted!


backing...i bought this ages ago with all intents to use it as a backing...


detail of quitling on back. for those that don't follow my blog, i'm not scared to have the thread color show on the back..


now i have a great quilt that all my "online" friends help create...thanks again!

i have the next swap planned and will be posting details after the new year...

burying thread tails

i'm going to share how i bury thread tails. this technique will work for burying threads in a LA frame or freemotion with a DSM. (this technique should not be used if your thread color is contrasting to the fabric color and will shadow through the quilt top fabric. rememeber the varicose thread post?)

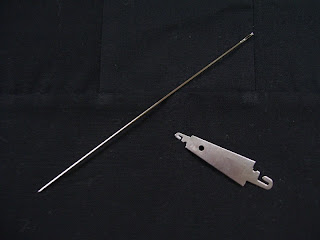
the tools i use is a 9inch doll needle and that threader thing. i use the doll needle because it's long and is easier to manipulate through the quilt sandwich while it's still in the frame. it also has a large eye which makes getting the thread tails threaded easier (read: it is eye strain friendly). i bought the threader (all metal) at my local hancock's (in the embrodiery aisle). i had a plastic one before that really didn't work as well. make sure the one you buy will fit in the eye of your doll needle's eye.


this technique will work with long or short thread tails...take the two thread tails and tie a knot in them (i use a simple square knot, going thru the loop twice in the second knot) insert the needle in the same hole the last stitch is in. slide the needle in the batting so that the buried threads will be in the batting. slide the needle down until the eye is even your knot.


use the small end of the threader and gently pull the tails through the eye of the needle.


carefully pull the needle to fully bury the threads. 

wha-la...buried tails...i would do the same with the thread tails from beginning a line of stitches, burying all four tails at the same time.

i bury tails where if i did the little backstich knot it would be too noticable. (ie: high contrast between the fabric color and thread color)

i used the self-threading needles and found that the eye pinched the thread and tended to break it to the point of being too short to bury anymore.

peek-a-boo

i'm not going to apologize for not blogging for over a week. i was working through a bit of a slump, and i didn't feel like blogging...

i'm back now and want to tease you with what i have the the frame.

this is my Sister's Choice block swap quilt....just a small taste from the back. i'm still pondering what will go in the black background....

trade quilting

a while back, i traded quilting with a lady from my LA forum, Monika...i quilted hers and mailed it. since she has offically recived her quilt (mine she quilted is here) i can post pictures.


it was big!!


i like how the black backing shows the quilting.

(you can click the picture for a bigger, better view. just click the back button on your browser to come back here)

she blogged about it on her blog here (she has good pictures of it on a bed)


(notice my new signature? what's that? you want one too, huh?....you can get your very own by following Jennifer's tutorial on her blog. :) )

winner winner, chicken dinner

i'm a slacker- beat me with a wet noodle! i'm just now getting around to postng the winner of lucky's photo caption (2 points if you actually remember that)

without any more delay, the caption i liked the best was:
Vicki W....she won a custom made bento box tote from me and picked red and black as her color combination. that was not easy for me, as i have no red in my stash. i'm not a red fan...i made it and mailed it and she let me know she recieved it...i promise to not to take so long next time....

i would like to *wave* at all my readers! i noticed i now have 141 followers! thanks for stopping by and reading my blog!


scrappy crafting

i saw a few weeks back a fabric wreath on a blog that was inspired by another blog, and so on...

so i dug out some batik scraps (cause they look pretty on both sides) and went about making me one.

it is just a 12" wire floral frame (joann's) and i tied the fabric strips to it, filling each section tighly. i used fabric scraps measuring approximatley 1.5"- 2" wide by about 6 inches long....

after i got it completely finished, i gave some longer pieces a hair cut.
this is not a quickie project. it took about 5 hours to tie all those strips, but i think the fullness was worth it. i did it while i watched Bones on the DVR, so time went quickly.

for hanging, i just tied a strip to the back and hung it from the loop. i'll be using it only inside...lord knows what insect habitat i would create by putting it outside.


pretty, scrap friendly, and super simple...i like it.

new toy!!! and proper introductions

davis made the comment in a recent conversation that he wished i would go with him to the hunting club with him during archery season and i simply said, "well, if i had a bow i would." (it's not fun to go to the hunting club and not hunt, duh)
"well, let's get you one"
"okay" i'm thinking that like the previous four years of saying i wanted one, this was another 'blow off' promise....

i was wrong! remember the trip to SANS? all the ordered parts for my bow were shipped and i am the proud parent of a new bow! i am super stoked!

Meet Elvis (he has blue shoes, get it? i was thinking calling it Dory cause it's blue and i have a Nemo (orange) but i have a friend named dory and it could get confusing...then i thought 'Lucy' but i already had a Lucy, so elvis it is)

the details:
Mathews Passion (turq and black)
44lbs/26.5" draw
whisker biscuit (i LUV that name) arrow rest
trophy ridge sight with 3/16" peep
mathews quiver that has it's own little noise dampener

he is quiet and fast!


after we got home last evening, i was anxious to play with my new toy. Davis set up his work lights and we flung a few arrows across the yard!


davis

(isn't he so handsome with his perfect form)


me

i have to work on my 'form' and learn to relax both my hands. just like in LAing, i'm learning my muscle memory...

my left arm is a bit sore, but it's expected. i'm using muscles i don't normally use.


here's what i did during my 'lunch break' today before it started raining. *grin*

(just in case you were wondering: 20 yards and the second day of practice.) i was aiming for the black dots...one arrow per dot. not bad, and it's encouraging to see progress so quickly.

it's not easy, but like Matt at SANS says, "if it were easy, everyone would do it"


one last picture...this is my favorite from last night.

reader's block swap quilt

one of my block swappers for the sister's choice swap emailed me pictures of her quilt:

Shannon,

Here is a shot of my block swap quilt. I loved it so much that I enlarged by 8 blocks making it 5 X 4. I have since put the borders on it and it looks so good. Found a batik backing I like and as soon as I wash that I will take it to my friend, Michelle, to quilt it. I really enjoyed participating in the swap. I look forward to the next one you do.
Laurie

isn't it beautiful! thanks for sharing Laurie. i'm in the planning stages for the next swap which will start after the first of the new year. i think you'll like it!

quilters have always up-cycled

my granny told me stories about sending pap-paw to the feed store with scraps of feed sacks so he could get her more of the matching sack when he bought the feed to make more clothes and quilts.

today with society being more aware of the environment and trying to be more 'green'  i kindda chuckle....quilters have been recycling for years! we are always coming up with creative sources for fabric. (i've even made totes from dog food bags!)

i've quilted memoryquilts made from recycled kid's clothes, and let's not forget the ever popular t-shirt quilt.

tracey was no different- look at her sister's choice quilt made from scrubs...

i loved the solid black background and was ever so pleased when she mentioned she wanted feathers quilted there...


this past weekend, davis and i took barney to Bass Pro Shop to fit him for a hunter-safety orange harness and collar (he's in training to track deer). he went crazy over the fish swimming by in the big aquarium they have. he had a little crowd watching him try to figure out how to get them...

perfectionism is sooo last year :)

hey, what perfect timing! so on the back of my 'perseverance' posts i stumble across Erin's post about her perfection protest that was inspired by Brene's post. so see, i'm not the only 'stop-being-hard-on-yourself' cheerleader! i tell you it is very freeing!

i'm totally scoping out amazon for brene's book....i love the title: "The Gifts of Imperfection: Let Go of Who You Think You're Supposed to Be and Embrace Who You Are"

my sign (sorry no picture) :

"I'M TOO BUSY BEING ME TO BE PERFECT!"

save your shirt!

when i get to the bottom of a quilt, sometmes the pinned edge of the backing hits perfectly where i lean up against the machine (belly bar) it took ruining a tshirt or two before i had a lightbulb moment and figured out a very simple fix:


since i unpin the bottom of the quilt top from it's canvas to quilt the last pass anyway; i unroll the canvas enuf to cover the tpins of the backing....now i won't have little holes cross the belly of my shirt!

do pet the ferny things

this quilt went home, so i can post pictures of it. vicki made with a bali pop....


i quilted a ferny vine meander all over it...

*****SQUEAL****

 i'm chatting away on the phone and my two four-legged doorbells go ballistic. it was my snail mail lady, donna with a box...."huh, i didn't order anything" then i noticed the hawaii part....she jumped when i squealed.

my MiniQuilt from the APQS swap arrived!!!!!

(HI has their own special priority boxes!)

join me as we open it together....


oh, dark chocolate covered macadamia nuts and toffe popcorn and macadamia nuts!  Quilt fuel!


look at the pretty tissue paper....


i love the necklace....thanks to google i learned it is Kukui Nut Leis.


i love surprises! what could this be?


this is a travel pillowcase wrapping.....

(the pillwcase's form was included)


a very appropriate book :)


a CD with music i can quilt to! i already loaded it into my Ipod...


 *drumroll* without any further adue

MY MINI-QUILT!


can't you just smell the salty sea air and hear faint ukulele music?


i love hibicus! my granny had tons of plants in the front yard.


thanks again barbara- mahalo makamaka. malama pono i kou ola kino! 

i am going to cherish it forever....


keep at it, you will succeed- Part Two

(part one HERE)

one of the comments left on my first perseverance post asked simply:

“Isn’t it difficult to force yourself to live with less-than-perfection?”

my answer is no. i never looked at it as ‘less that perfect’. I saw it as part of my learning curve and looked forward to growing it into my own style. it’a as good as I am right at that particular moment, not some fantasy moment in the future. Aspiring to perfection right out of the gate would not be fair to myself. the frustration and disappointment would make me my own worst enemy. I would never have anything to aspire to and would never allow myself to make mistakes and use them to grow and become better.

when I first started LAing, I ‘looked up’ to Karen mctavish. I envied her success and talent. i drooled over the pictures of her quilts. i wanted to quilt feathers just like hers. she had years worth of a head start on me to practice and hone her skills, I knew I could quilt like that, but I had to master the mundane everyday motifs first. I couldn’t quilt ribbon worthy feathers, but by golly, I would quilt the darndest prettiest meander you ever laid eyes on. then I got brave (who-hoo) and tried a loop meander, then swirls, then whirls. all that time I felt more and more comfortable with the machine. I started to feel like the preverbal duck to water. After all, I had people paying for my quilting, so it couldn’t be all that bad, right?

I went to a quilt show where a lady was demo quilting on a long arm. she made it look so easy! moving from one design to another so effortlessly. I was excited to get home and pin on some muslin and try quilting like that too! my excitement was a bit misleading as it wasn’t as easy as she made it look. i took a breath and told myself, “not right now, but soon.” I doodled on anything that would sit still long enough. feathers filled every empty space on scratch notes…I grabbed a dry erase board and drew the same design over and over and over until I could do it in my sleep. that was my ticket- perseverance.

don’t get me wrong- that little black rain cloud voice got to me. “you can’t do that” “oh, what were you thinking” “that’s ugly” “that doesn’t look like So and So’s quilting” I would doubt myself and doubt my abilities, but I would look at my first practice pieces with the squared top loops and half-inch long stitches and realize that I was growing and getting better, and I would be happily quilting along again. just like in life- the ‘ugly’ beginning is needed to make the glorious part easier and fun. ‘less than perfect’ is just the first step in a long journey to ‘close to perfect’ my quilting shouldn’t look like anybody else’s quilting but mine.

remember, that anything worth doing is worth doing badly for as long as it takes. it is just fabric and thread- they make more of it everyday! if it really that bad, there’s always frogging. (rip it, rip it, rip it) if you’re like me, you have a room full of fabric! stop beating yourself up for ‘less than perfection’ stop comparing yourself to others. quilters are their own worst enemies…there are no ‘rules’ it’s not wrong if it makes sense or looks good to you. not to sound snarky- I do not quilt for others, I quilt for me. I see a quilt and immediately have a ‘vision’ of where I want to take the quilting….

quilting, like art, is subjective. put 50 quilters in a room with one quilt and you will get 50 different reactions to it. so are you going to pout in a corner because 50 people didn’t agree with your vision? or will you shrug your shoulders and move on because you are happy with your quilt? I went to school for art and the most difficult part was the critique days. I HATED them. everyone in a room pointing out what was wrong with your work. such a harsh and fierce environment for an aspiring artist. i always made a point of discussing my classmates’ growth in a certain area: how well they were expressing the subject or how they were seeming to grasp the medium…I tried to give some positive reinforcement…we all need an ‘atta boy’ every once in a while, even if we only give it to ourselves. nobody wants someone to point out all our mistakes, so why do we so easily do it to ourselves? my favorite motto is from one of my favorite artists, Bob Ross. “there are no mistakes, only happy accidents” I think that an artist's most difficult job is recognizing their own voice/style and being comfortable with it.