these directions will make a standard sized pillowcase.
please read through all directions before beginning. clicking on a picture will make it bigger so you can see details. click the back button on your browser to come back to the tutorial.
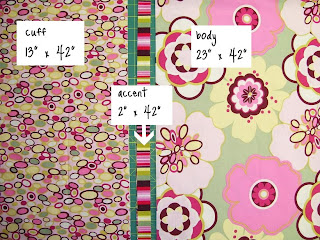
1. you will need three fabrics: the body of the pillowcase (the floral), a accent (the stripe), and a cuff (the dots). cut the following: body: 23" x 42" cuff: 13" x 42" accent 2" x 42" if you have a direction print, double check when you cut it so you don't have upside down motifs....ask me how i know that....if you have never made a pillowcase- i suggest your first one be made with non-directinal prints...it'll take one PITA detail out of the equation...
2. fold the cuff and accent fabrics wrong sides together and press. this will make things easier on down the road...
3. sew the short ends of the accent and cuff pieces with a 1/4" SA. Press the SA open and repress the fold.
4. using a coordinating (or contrasting) thread, sew 1/8" from the fold on the cuff.
5. fold body fabric in half right sides together, and press. using a 3/8" SA, sew one short end and continue up the long end. back tack at the beginning and end of this seam, as well as the corner for reinforcement.
6. pin accent fabric to the right side of the body fabric, matching the seam from the accent to the seam of the body. to prevent bulk, off-set the seams 1/2" or so.
7. match the seam of the cuff to the body fold, and without removing the pins holding the accent fabric, pin the cuff to the pillowcase body. i just put the pins between the ones that are already there. remember, there is no such thing as too many pins...
8. this is what it will all look like. notice you can't see the accent stripe.
9. using a 1/4" SA and sewing through all layers, stitch around the entire pillowcase. i don't have a serger, so i have to go back and zigzag the edge to prevent unraveling.
10. i just pinking shear the SA of the body. i reckoned that since there's going to be a pillow in there and it won't be highly visible, this is an okay treatment for unraveling....i have zigzagged the raw edge of the body and all it did was make it stiff. if i had only had a serger.... :) santa???? my birthday's soon too....*hint hint*
11. turn the whole pillowcase right side out. i press the accent (now a flange) towards the cuff. stand back and admire your lovely new pillowcase. good job!
now- there's all sorts of 'embellishment' ideas to do...some examples:
-i think it would be cool for children to have all sorts of different pillowcases...it could be used to help them 'stay' in their beds at night....
-make ones to match the seasons, or a specific quilt. an added bonus to making ones that match a quilt: if (forbid) something happened to a quilt and it needed to be mended, you can sacrifice the pillowcase to replace/mend the quilt. also, if a quilt is stored in it's matching pillowcase- you can look at the folded stack and know immediately which quilt is which...
-if you have a fancy sewing machine that has all the decorative stitches, use a solid fabric for the accent and with a contrasting thread, stitch a decorative design along the folded edge....
-use prairie points instead of the accent strip.
-embroider/monogram initials/names on the cuff....
the possibilities are endless....this tutorial is just a blank canvas waiting for your imagination and creativity!
happy stitching!


Thank you. I'm definitely going to make some today with Christmas fabric!
ReplyDeleteSewCalGal
www.sewcalgal.blogspot.com
This is great! But I think in step 2 you mean "wrong sides together."
ReplyDeletethanks- i did fix that!
DeleteIs there any way to do this with French seams on the body? I agree with you totally about the cuff!
ReplyDelete--heidi