with the no waste flying goose (NWFG) method, you'll sew 6 seams and end up with 4 flying geese units that have no waste (duh), sewing no bias edges, and no edges that are biased.
No Waste Flying Geese .pdf
here's the 'secret' math of the goose.
here's a chart of some common sizes of flying geese used in quilting.
 you'll need 4 small squares, and one big square. this shows where each fabric will end up in the finished goose unit.
take your larger square and lay two smaller squares across the diagonal. match the corners of the little squares to the corners of the large square. place two pins at the two corners.
this is where the accurate points come in. where the two smaller squares cross each other, check that your drawn lines continue across each other in a straight line. place a pin to hold where they cross and if needed place a pin in the middle of each little square.
take to your sewing machine and sew on both drawn lines. here's another one of my 'tricks'....i press my sewn fabrics before i press the seam allowances. my theory is that by pressing the fabric 'flat' that it warms up the fabrics and makes preps the fabric and makes the seam allowance press easier with no 'dunlop' (dunlop is where excess fabric hangs over the sewn seams).also, i do not press on a traditional ironing board. i press using a hard surface board. i took some furnture grade plywood, wrapped it in a couple layers of scrap batting and covered it with some duck canvas. i noticed immediatley that my blocks pressed better. notice in the picture the difference in the two fabric pieces. the pressed one lays flatter and is neater.
cut the unit apart by matching the edge of your ruler to the points of the large block.
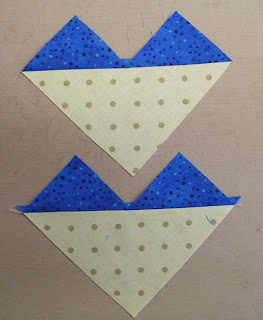
press the SA towards the little squares. i like to think that it looks like a heart at this point.
i trim off the 'dog ears as i go. notice the top one is trimmed, the bottom still has it's dogears.
place the two remaing little squares on the diagonal across the bottom of the 'heart' and pin.
check that the drawn lines hit the edge of the little squares first sewn. i think of it as the lines hitting exactly in the valley of the mountains.
sew on the drawn lines, and cut apart. press the SA towards the little squares.
trim off the dog ears, and ta-dah! 4 NWFG units. of course this is just one of many ways to sew fly geese. this is my favorite, and the way i sew all my flying geese. with the easy math secret, if you have a pattern that uses a different technique, you can easily do the math and cut your fabrics for this method.
happy stitching...


Love the goose on the easy math diagram! Thanks for the great pics and easy instructions. This is the 'only' way I like to do these FG blocks too.
ReplyDeleteVery clear tutorial. Thank you. I'm going to save this one!
ReplyDeleteexcellent...I always need pictures and yours are great. I'm saving this too!
ReplyDeleteGreat tutorial. Very clear pics and descriptions. You are one clever lady!
ReplyDeleteDiane P
Hey Shannon,
ReplyDeleteI just learned this method a couple of days ago and then got on your blog and saw your post.
I know you have known for a long time, but I don't get to sew as much as you so it took me a long time.
Go look at http://thegreateratlantaquiltshophop.blogspot.com/ to see a sneak peak of our shop hp quilt, which is what I was working on when I learned this method
I have never seen this method before, and it looks really easy the way you wrote it up.
ReplyDeleteI am going to try it next time, thank you for sharing!
SheilaC
Great tutorial. Have not seen this method before and it looks like a great idea and a more accurate way to do flying geese. Thank you so much for sharing.
ReplyDeleteHave a great day.
Thank you for your great tutorial. I have put a link to it in my blog's article today.
ReplyDeleteYou are the best.
ReplyDeleteGreat tutorial for making easy flying geese. I was looking for either a chart or math and you provided both. Thanks!
ReplyDeleteIt's a lot less complicated and faster to just paper piece them.
ReplyDeleteMany thanks for the tutorial. It is exactly what I was looking for.
ReplyDeleteThanks
Thanks! I'm using this to make my first flying geese quilt!
ReplyDeleteThe instructions for a quilt I want to make allow for a lot of waste when making flying geese, and it just bugged me. I Googled "flying geese instructions" and found your site. Thank you for this tip! Your instructions are very clear and the photos make it very easy to understand.
ReplyDeleteAgreed! So much waste with other methods. Thank you for this very helpful tutorial!!
DeleteThank you so much for posting this!!
ReplyDeleteWow this was great, I searched all night for one that explained the different measurements, you have the best explanation and photos thank you so much
ReplyDeleteThanks for the tutorial. I am using your tutorial for an online bee to make curtains for my bedroom.
ReplyDeleteWhat do I use for the finished measurement, the size of the flying goose when it is completed or when it is sewn into the project?
ReplyDeleteWhat do I use for the finished measurement, the size of the flying goose when it is completed or when it is sewn into the project?
ReplyDeleteThanky very much, a great tutorial.
ReplyDeleteI hope, that it´s allright that I´d pinned it?
Thank you so much, I was asking for an easy tutorial just yesterday on my blog ;o) Happy coincidence!
ReplyDeleteThat is new to me, thanks!
ReplyDeleteVery easy to understand. Thanks very much and I will save it til I need it.
ReplyDeleteME TOO..Very easy to understand. Thanks very much and I will save it til I need it.
ReplyDeleteWould it be ok if I shared a photo from this post in my upcoming newsletter? I'm featuring flying geese and several construction methods. I'd link back to this post and Ig if you'd like. Thanks for considering! Debbie/A Quilter's Table (also find my on ig as aquilterstable)
ReplyDelete