!!SWEET!!

so rememeber how in my pillowcase tute i complained mentioned that i didn't have a serger....

GUESS WHAT!!!!

michelle read it and offered a trade which i jumped all over like white on rice. she has a quilt she needed quilted...well, what do you know? i quilt tops that needed quilting! ....she also had a serger she no longer used.....hey i need a serger....

so check it out! ain't it so cute....it's so tiny...and it works like a dream (my first bernina! don't tell the singers)


sweet dreams sweet pea!

i've already test drove it....i made me some new pillowcases...now to make those valentine pillowcases i've had fabric for forever!

check out that polka dot fabric! isn't it the best trim for the pea pods....and i had the basket weave in my stash...it's the little things that make my heart flutter...

thanks michelle....


lucky told me that he feels depressed because barney's caption contest got 34 comments and he only has 19....i tried to explain, but he dropped his ears and sadly walked down the hall to bed....i tell you it was enough to break your heart.... Lucky's caption contest ends sunday ( i bought a new little zippered pouch pattern and i'm itching to make one)....so jump over there and see if we can perk him up.... 

LA tip: stitchin around applique

i think the "A" word equally strikes fear into piecers as well as LAers. it's not really that bad. i have motto in my studio: whenever you are scared of something- stop thinking and do it anyway! (that's just one of many, we all need cheerleaders!)

so i was working on carolyn's Be Attitude quilt designed by Nancy Halverson, and it has it's fair share of applique, so i thought i'd share how i tackled SIDing all those letters.

now i'm a 'lazy' LAer, i don't mind stops and starts (S&S), but i will try my darndest to avoid them...so i knew i was going to do my doodlebug filler in the background an that meant i could use the filler to 'camo' my SID....i wouldn't have to S&S for each letter...

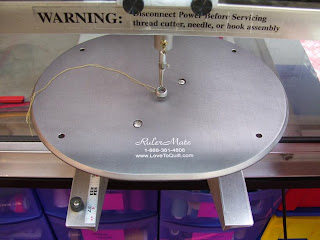
first, i have to show you some tools of the trade for ruler work.  first you'll need a ruler base....i have an old version of the hartley base but it wasn't making me happy, so i saved my pennies and bought Donita Reeve's RulerMate (click on machine accessories in the left hand column). let me tell you...i wish i had gotten it sooner....i love it! it screws to the base of my machine making a nice study base for ruler work....i leave it on all the time....i don't even notice it anymore...and to be honest- my outlining of applique improved just by changing my base...you're only as good as your tools....


second, i use what i call a 'appli-key' it is basically an acrylic 'micro-drive' for my machine. it has all those cut outs that fit around my hopping foot perfectly. i use it in the 'push/pull way' that means i push against my hopping foot with the key, while i pull my machine's handles. it takes alot of PPP, but you'll get a good balance and have better control of your machine. (this one is also from Donita Reeve....click on rulers/templates. she calls it an Appli-guide)


(i want to add this: depending on the quilt and my mood- i might actually dig out and attach my microdrive handles)


i quilt my background design and when i get close to the letters i stop and grab my key.


you can see where i came up to the bottom of the T and went over and around the top and where the edge of the T got close to the S, i just 'jumped' over and quilted around the S and so forth to the beginning of the word. (you can click on the pics for a larger view)


then i just came back under the letters, using my filler design to 'jump' from letter to letter, and then when i get back to where i started i just quilt back into the background with my quilting.....wha-la! the lazy way of SID- it's all camo-ed by the background filler....and i only have one or two S&S  per pass.

it's amazing how resourceful you can be when your lazy.... *giggle*

(i did S&S for the inside of the Bs, As, Ps, Os, and Ds. i did not stitch the inside of the Es)

here's a shot of the whole quilt. you can see that there are alot of letters....


maybe i should say i quilted it 'smart' not lazy...yup, i like that better....i quilted it smart.

bored?


i have recently uploaded all my customer quilts pictures to my flickr account. webshots just isn't doing it for me anymore...WAY too slow (and very ad heavy) plus, i think it's where i got the virus/trojan that crashed my puter *shrug*

so if your bored and like looking at quilts, you're welcome to hop over to my flickr page and browse through the pictures....

i've pretty much hit my limit on uploads for the month, so next month i'll upload my personal quilts...i'll link when that happens...

modern quilty goodness!


this is the quilt that heather made for her daughter.....it has matching pillowcases and even a body pillow....i'm loving the color scheme....heather's daughter is one lucky girl!


(i'm getting good at these whole 'artsy' shots, huh?)


with the busy-ness of the fabric print, it just needed an E2E so i did my signature cotton candy allover with a white thread. it adds a nice texture to the quilt....i luv texture

GO COLTS!


these are the colors he wore when i started rooting for him....


these are the colors he wears now, and i still root for him....

*fingers crossed*
here's hoping for super bowl XLIV. i want IND vs NOL (davis is a saints fan) .....plus i think it's a "deserves it" type thing....both teams were both undefeated the longest.....


(ETA on monday: SWWEETTT!!!!!)

birthday day


i had a great day! thanks for the birthday wish comments!

davis went to our local chinese buffet and got me a box of my most favorite cakes (anybody can go to the store and get a sheet cake) there is a lanuage barrier, davis was trying to explain the the owner what he wanted, and the owner kept pointing to them on the buffet. then our 'normal' waitress noticed davis and came over wanting to know where i was at, he explained the situatiuon to her, she explained it to the owner, and i got my cake!....they melt in your mouth like cotton candy and aren't sugar heavy....

i forgot to mention that barney's shares my birthday...he got his share of cake. lucky enjoyed a slice too....lucy turned her nose up in true feline fashion

one two-three


so today is the thirty-third time i celebrate my entry to this world *wave*


(let them eat cake)


(ETA: that's not lucky....it's a pic i found on the web)


so i got curious, what else happened today in my lifetime?

1977 -$1.5-million Serge Lepage dress exhibited in Paris
1977- Miniseries "Roots" premieres on ABC
1983- "A-Team" with Mr T premieres on NBC
1986 - The Rock and Roll Hall of Fame inducts its first members: Chuck Berry, James Brown, Ray Charles, Fats Domino, Everly Brothers, Buddy Holly, Jerry Lee Lewis and Elvis Presley.
1988 - Experimental airplane Voyager, piloted by Dick Rutan & Jeana Yeager, complete first nonstop, round-the-world flight without refueling lands
1989- Surrealist painter Salvador Dali dies at age 84.
1991- "Seinfeld" debuts on NBC-TV (yada yada yada)
1995- In Toronto, Ontario surgeons at The Hospital for Sick Children perform a 17 hour operation to separate Pakistani Siamese twins Hira and Nida Jamal; Nida died a month later
2003 -Pilot 1 and 2 of the television series MythBusters.

(wanna read more)

a customer quilt!

i feel like i'm getting back into the grove of a 'normal' routine...the holidays and the trip to tn...just haven't felt very creative or quilty... i threw myself into the bom planning so that was a nice 'healing' route....so it's nice to post pictures of my kicking-and-dragging back into life trip....


this is amanda's quilt...this is amanda's gorgeous quilt. i really like the layout....it was a big quilt: 92 x 108. i did keep up with a bobbin count on this quilt: 20 bobbins!!!


(ETA: someone asked about the pattern/designer: The pattern is "Vintage Moments" by Marsha McCloskey. amanda added the flying geese at the top and bottom to make it bigger)


i custom quilted it with CCing, feathers, and my little triple fluer-de-leis design.


isn't this a to-die-for arty shot?

makes you just want to reach out and touch it....


pictures from the farm

i promised to post pictures from the farm...


it was cold and this little guy found the perfect place to hide from the wind...gives new meaning to 'bird brain' huh?  ....over the years, many critters have called that pipe home...in the spring there are usually nests in each end....


he's me feeding the cows. a heifer got out and i attempted to tempt her back with feed...it almost worked til the rest of the herd saw the white bucket and came running...davis's camera didn't like the cold and gave all the pictures a pink cast, but i think it's a nice effect....(bob ross- happy accidents) our farm is a meat farm-there are herefords (the red ones)  and black angus. there was a couple of sharlays, but they're gone now....that particular cow is certified angus (she has papers) and is named "Agnes'..get it black angus...


here's is my sister's, hannah, beux...he's a K-9 officer. his name is michael and his four legged partner is greggor, a dutch Shepperd. (greggor is still a puppy)  i got to play hide and seek with greggor. i hid and he came and found me....and the whole run-thru-water-to-throw-off-the-dogs in the movies is crap! greggor found me in seconds flat....and all i had were wet socks....then i realized while i was waiting that i forgot to ask how to act when he found me. previous conversation details immediately replayed in my mind. details like 7000 lbs of bite force....ooppppsss......but he just ran back to michael for his toy reward....oh- you should see the 'back seat' of the cruiser. it's a plush little dog kennel. complete with rubber floor....i totally need one for traveling with the puppies...


here's the view of the house coming down from over the hill....i like this picture...it's a favorite....you might have to click on it for the whole effect.  see the white house with the dark grey roof, that's it...

i'll just have to assume

i mailed the giveaway prize for barney's caption winner on tuesday.. USPS Priority mail...i assume it made it *fingers crossed*  so here's what is sitting in kim's po box waiting patiently to get outta the box...


i made her one of my little pouches with my 'trademark' fried egg flowers appliqued on it.  kim said her favorite color was green...hey me too....no problem finding greens in my stash! i even had a green zipper!


look at the inside! that zipper is put in by hand...i covered all the raw edges...by hand! check out the zipper pull- it's a fabric bead sewn by hand! see, i love my readers!

so are you drooling?  would you like to own your very own of these little pouches?- head over to lucky's picture post and enter a clever caption for your chance to win one custom-made shannon pouch original....you get to pick the color....end of the month is the deadline....you're still here?

i love emails with pictures

especially when they include pictures of quilts y'all make using my tutorials! it solidifies the fact that someone does actually read those things....

so here's the latest picture that popped up in my inbox. kristina, from the apqs chat, made this lovely quilt following my wonky squares tute...

pretty......thank you for sending the pic to me K!

i must add that the quilting is bee-you-tee-full as always...

sharp point on leaf tutorial

this is the last in the postings for the applique BOM medallion. unless i see a strong need for another...

Using the templates provided in the pdf, prepare the leave fabrics for needle turn appliqué using your preferred method. (i use the trace-around-freezer-paper way- i learned it in a hawaaian applique class- it works for me) In the pictures I have used a red marker, I WOULD not do that to the actual piece I would be using in the finished block/quilt. I used red because it shows up nicely in the pics.

Also, I only photoed one leaf unit. I suggest doing all the leaves at once. I store my prepared leaves in a piece of folded cardstock in a Ziploc baggie. Keeps them from getting lost (or eaten    barney….TMI- it takes four days to 'recover' an eaten 1/2sq unit) and keeps them from getting wrinkled.

(clicking pictures will open a bigger view. then click the back button to come back here)


1. Place the ¼ block drawing on a lightbox, lay background fabric over drawing and mark general lines for placement of all leaf units. (yes i already did the top leaves before i realized i needed a picture for the tute, but you get the idea...*smacks wrist*)


2. With ¼ block still on light box, lay the leaf labeled N on top of drawing, matching lines. Glue the edge of leaf N where leaf part O will over lie.


3. Carefully place leaf O using glue stick to temporarily hold it.


4. Remove from light box and double check that the pointy line of leaf O lines up with the line of leaf N. not the cut seam allowance edge- the drawn line that is the edge of the piece after needleturn.


5. Thread needle with appliqué thread (I use metler’s 30wt. poly) and knot. Bring thread through leaf O’s point.


6. Needleturn appliqué the over lying part of leaf O, stopping at the point where the two lines cross. Tie off thread.


7. Flip entire unit over and snip into the seam allowance 1/8” - 3/16" above the point where you stopped stitching. This will make turning under that part easier later down the road (yes, I had to unsew some parts to learn that lesson, but my goofs prevent you from goofing. see how that works. love me yet?)


8. fold back bias stem and use pins to hold it. Using the registration lines from step #1, place leaf unit on background. Adjust as needed, then use glue stick to temporarily hold piece.


9. Appliqué the entire leaf as it were one fabric piece. When you get to the spot with the two layers of fabric, carefully turn them under together as though they were just one fabric. securely stitch that area, you don't want the leaf to come out from under itself...


10. Notice how ‘neat’ that point is? It isn’t all frayed and bumpy. Smooth as a baby’s bottom…lemon pleasy! I guarantee a judge would take notice that little detail (it’s the way they look at a quilt…the little details that show you understand the ‘process’)

if you have any questions- email me. my add is in the right sidebar.

now i'm sure some really experienced appliquer is reading this and is like, "well duh" but i'm kindda in the self-taught box, and i haven't taken alot of classes. i feel pretty darn proud of myself to have figured that one out by myself...don't ruin it for me....smile and nod, boys, just smile and nod

Applique background prep tutorial

This is not a applique how-to. If you have never appliqued, by hand or machine, I suggest a trip to your LQS for a class or book to cover the basic instructions. These directions are for you to understand how I have laid out the templates and how to make sense of all my chicken scratch on the pattern pdf. :)

I do my applique by hand using the needle turn technique.  I’ve not really done fusible machine applique, but understand the general principles  IE: unless you are doing needle turn, your set up/prep/all that good stuff will be completely different and the tutorials will probably be useless to ya......but hey, maybe, just may-be, you'll be motivated to at least try needleturn (try it you might like it).....i know it's the 'A' word in some circles....but wouldn't it be nice to carry your finished HAND applique quilt to your guild's meeting and beam proudly while saying, "i did the applique by hand" i guarentee you'll get a couple "Owwws" and "Ahhs".....unless your guild is a hand applique guild....then be different and do it by machine *giggle*

anywhoooo- moving on....

Cutting:
From the background fabric cut one 33” square. We will trim this down later and i'll tell you the size then.... Applique tends to ‘shrink’ the background, so we aren’t cutting it to size yet.

I used scraps and stash for my pieces. I do recommend using nothing smaller than fat quarters for the bias stems. I cut my bias strips from across the widest part of each fat quarter (corner to opposite corner). You’ll only need one from each fat quarter or you can cut all four from the same fat quarter- it’s your quilt! I used four different fabrics for each curved long stem, and one fabric for the straight stem of the large flower.

Prep:

Fold your background fabric horizontally in half and press.


Open back up and press it in half vertically, matching the ends of the previously pressed line on the edge. Make sure you don’t lose the first pressing line when ironing the second.


Open up fabric and mark an ‘+’ where the two lines meet. I suggest that you test your marking utensil on an edge or scrap piece to guarantee that the lines remove by your chosen way to your satisfaction.

(i'm going to share a story: i only use chalk pencils now. i used a water soluble pen (the blue one) to mark quilting lines (back when i was hand quilting everything) and when i got done and washed the quilt to remove the lines- where all the marks were bleached out. noticeably bleached out...just saying...)


Measure out each pressed line 15” and make a tick mark. (this is where it’s handy to have that big 21” square ruler).


Connect the tick marks to give yourself a 30” drawn square on your fabric. This is the perimeters of the block and no fabric should cross it. To ‘set’ the chalk lines, a light spritz of sizing/starch will keep the lines from disappearing, but will allow them to wash/wear off later down the road.


Mark the quarters of the block (15”) then mark the diagonals. Then mark the diagonal of the 1/4 blocks. Your background should look like this.


Mark the diagonal of each ¼ of the background using the horizontal and vertical center lines we pressed earlier.


Your background fabric should now look like this with the same corresponding lines.


Take the ¼ block drawing and using a light box lay the background fabric on it, lining up all registration marks. Your lines will be difficult to see on the fabric, take your time, the results will be worth it.

A light box can be made from a glass top table simply be placing a lamp under it. If you have a wood table, pull apart the leaves and place a piece of Plexiglas across and put a lamp underneath…a large window and tape works too…


Using the 1/4 block drawing and the lightbox, mark the curves for the bias stems.

 *see photo below before marking stems*

this picture is after i marked using the lightbox, the lines totally don't show when photoed on the lightbox....


Don’t draw the lines where the stems go under each other. This will allow you to easily place them and this will let you ‘weave’ them later. the ‘broken’ line goes under the stem that isn’t. geez, does that make sense?


Collect your bias stems, pins, and elmers stick glue. The glue stick is water soluble, non-toxic, acid free, and photo safe. It’s inexpensive and readily available. (ie- i got it at walmart)

I used two clover bias tape makers.
The curved stems are 3/8” wide, cut at 7/8”….i used the clover maker # 9.

The straight stems for the larger flower are ½” wide, cut at 1” using the clover maker #12. I use bias for the straight stem for durability on the raised edges.


Using the pins and glue, place the bias stems, weaving them under and over each other. Refer to the drawing of the ¼ block and full block diagram if needed for placement.


i also placed the straight stems also. the big flower's leaves fit under them...hide/tuck the raw edge of that stem under where the curved stems cross. refer back to this picture, or the 1/4 block drawing from the pattern pdf.

After I have all the stems placed and securely glued, I run a basting stitch through the center of all stems. This is because we have pieces (the leaves) that go under them and they will be used to place those pieces and the glue won’t hold them through the applying of all those pieces. I only use glue to temporary hold what I can applique at that time.

now you're ready to start appliqueing the whole block. here's the order:
  1. (see the leaf tutorial here) applique all leaves. the reason we placed our stems first is to make placing the leaves easier. it's like building a house, the stems are the foundation we build the rest of the walls on.
  2. applique the edges of all the stems. remove the basting stitches as you go.
  3. the 4 large corner flowers in this order- (referring to the assigned letter of the pieces from the pdf pattern found here)  D-B-A-C
  4. then the 8 smaller flowers in this order: (referring to the assigned letters from the pdf pattern) H-F-E-G
after you have finished completely appliqueing the entire block, make sure to post your picture to the flickr group page (if you're a member) or email me a copy. i'd love to see what you did with it!