Showing posts with label crafty. Show all posts

ear bud makeover

what do ear buds bloom into??? hehehe

so, i've joined the online social thing and recently reactivated my long time deleted facebook page.....then meg invited me to join pinterest, and who am i to say no? let me warn you- pinterest is a fun time suck thing. you start looking at others' boards and clicking links and the next thing you know, eight hours are gone. *opps* (but since the holidays have made it impossible to find anything i haven't already seen on TV, pinterest has been a fun distraction)
image source
 as i was clicking around on pinterest, i saw this pin and immediately thought i wanted to try it. i made a smack load of friendship bracelets in high school, so this was right up my alley. (the link under the pic will take to all the places i went to figure this out. i already knew how to make the knot that twists like that. they call it 'chinese stair steps', but i know it as 'french twist')
i have embrodiery floss, but way back before i started LAing, i hand quilted my quilts with perle cotton. i bought three skeins of this beautiful hand dyed thread and since it's just sitting in a drawer- mize well use it...
about 8 hours later, stretched out over the course of last week, this is what i have

*drool* pretty pretty

awesome, if you ask me....
here they are with my phone...a match made in heaven.

*perfect*
so then i decided that my new fancy earbuds needed a mode of transport. i remembered seeing Erin's circle earbud pouch tutorial around christmas. this was exactly what i had in mind.

so a couple hours this afternoon and wha-la, my fancy-smancy earbuds have a new home.

the really cool thing about this- the knot-wrap around the cords keeps them from getting all tangled up.

so, there it is- my first project of 2012...

pin bling

this is my pincushion. its magnetic and well, a little boring. don't get me wrong, i love my pincushion. it is after all a much needed notion if you sew! but after all these years i wanna look at something different, something with a little more 'bling'

let's make a pretty magnetic saucer pincushion!!

aahhhh.....


let's collect what we need.

first you'll need to track down 'power magnets' i found mine at Hobby Lobby. three pack for $3...make sure they are power magnets. they will look like watch batteries. you'll need two for this project.


next, a trip to the local thrift store to find some nice teacup saucers that have long ago lost their mate. they were very budget friendly- less than $1 each. look for a distinct circle in the middle with slightly raised edges. flip the saucer over and double check that the bottom has a indent deep enuf to 'hide' the magnets.

i like to pretend that the saucers are so sad sitting there on the shelf knowing that without the teacup thay are undesired. then i come along and buy them and give them a second life....i need to get out more :)

anywhoo....you'll need some super glue too. i like the squeeze control gel. (if you get super glue on your fingers- acetone fingernail polish remover will get it off)

okay so let's make a pretty pincushion...

i took some sand paper and roughed up the glaze on the bottom of the saucers. i just wanted to make sure the glue had a good surface it could bond to. wipe it and the magnets with rubbing alcohol to remove any oils and residue to help the glue have a good bonding surface. honestly- this was probably over kill because the magnets will hold themselves pretty good just from the attraction of the pins...

now a short science class. magnets have poles and will either repeal or attract depending on which end of the pole is close to another magnet. this is important because we don't want the repeal in our magnet once glued to the saucer.

glue one magnet to the bottom of the saucer close to the edge of the indent for the teacup. wait a couple seconds for the glue to set..........then flip the saucer over and 'stick' some pins the saucer. now place the other magnet on the bottom of the saucer. the pins will help hold it. if it keeps sliding away from the first magnet, flip it over. (this is the poles attracting or repealing) remove the magnet, making sure that you place the glue on the side the was against the saucer. i placed my magnets about one onch apart....place the magnets as far apart as your indent will allow.


let the glue set- an wha-la! a pretty magnetic pincushion that is inexpensive enough to make for all your quilting friends!

Em over at Em Celebrates is running a blog theme that celebrates the sewing notions behind the scenes. this qualifies as celebrating the humble pincushion!

it's the little things....

davis is a great resource for unconventional needed crafty supplies and over the years has learned to stop asking what i am going to use my special requests for.

recently i needed a big chunk of good, sturdy, clean cardboard.  not to be out done, he brings me a box that a light fixture was packed in. this box was 2foot by 4 foot. PERFECT...


i grabbed my utlity knife and started cutting....


this is just what i wanted!!! some masking tape and i have a fence for my sewing machine!

i got tired of her jumping off the table and trying to run away...


just kidding!

my sewing machine cover needed some support. the cover was a bit flimsy and it needed some reinforment....ahh, order has been restored in the studio :) it's the little things.

scrappy crafting

i saw a few weeks back a fabric wreath on a blog that was inspired by another blog, and so on...

so i dug out some batik scraps (cause they look pretty on both sides) and went about making me one.

it is just a 12" wire floral frame (joann's) and i tied the fabric strips to it, filling each section tighly. i used fabric scraps measuring approximatley 1.5"- 2" wide by about 6 inches long....

after i got it completely finished, i gave some longer pieces a hair cut.
this is not a quickie project. it took about 5 hours to tie all those strips, but i think the fullness was worth it. i did it while i watched Bones on the DVR, so time went quickly.

for hanging, i just tied a strip to the back and hung it from the loop. i'll be using it only inside...lord knows what insect habitat i would create by putting it outside.


pretty, scrap friendly, and super simple...i like it.

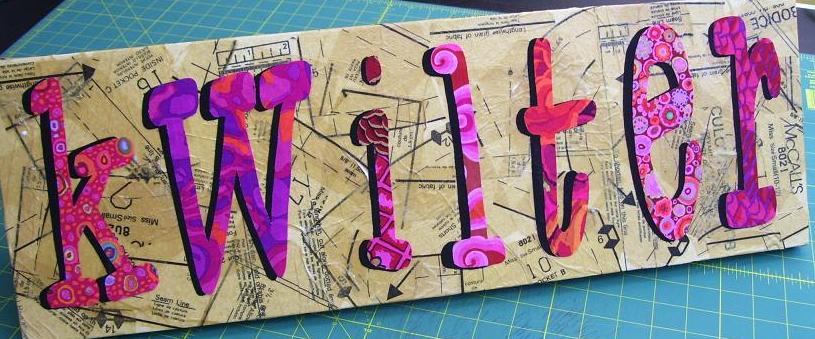
it's dry now!

okay it's done! cool huh?

so all it required was an 8" x 24" canvas from JoAnn's, ModPodge glue, and fabric scraps. the yellow is pattern tissue pieces. remember the little flying goose pendant i bought? well, it was packed for shipping with crumbled pattern pieces. i saved them and decoupaged them to the canvas and while i waited for the glue to dry i cut out my letters.

i made two sets of letters; one black and the other scrappy  Fassett pinks. i used Microsoft Word to print out the letters. then i put a layer of ModPodge and carefully stuck them down.

now i have to nail some picture hangers into the back and i have a new sign for my studio....i have other ideas for this technique....

watching glue dry

so, wonder what am i making?????   

besides a mess


stay tuned

reduce, reuse, recycle, repurpose!

in this new 'green' age, i'm find myself looking at everyday objects wondering how i could reuse or repurpose something to keep from throwing it in a landfill.
i've had these jars for quite a while. i found them in a recycling bin outside a bar while i was in college (i only got two, because i have two hands and my friend wouldn't carry one for me). i just like their shapes. one was my change jar for years! the other just keep it company. then i started quilting 'full time' and i was saving all my scraps of batiks not knowing what to do with them. so i saw these jars sitting empty, so i started stuffing my batik scraps in them. i thought they made nice avant garde art pieces. flash forward couple years and i was at home depot looking around (one of my thinking-outside-the-box excursions) and i saw they have "bottle lamp kits" i immediately thought of my fabric jars. i bought two kits and came home and this is what happened. and with energy efficient fluorescent bulbs, they truly are 'eco-friendly'.

word of advice, if you plan to do this- keep the lid of the bottle. it'll make it easier- trust me! did you know they make a kit to make lamps out of mason jars??? i've got an idea for that as well....