so i was working on carolyn's Be Attitude quilt designed by Nancy Halverson, and it has it's fair share of applique, so i thought i'd share how i tackled SIDing all those letters.
now i'm a 'lazy' LAer, i don't mind stops and starts (S&S), but i will try my darndest to avoid them...so i knew i was going to do my doodlebug filler in the background an that meant i could use the filler to 'camo' my SID....i wouldn't have to S&S for each letter...
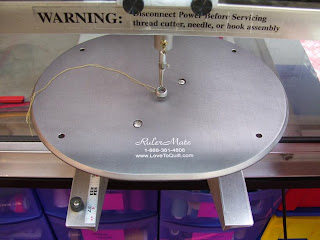
first, i have to show you some tools of the trade for ruler work. first you'll need a ruler base....i have an old version of the hartley base but it wasn't making me happy, so i saved my pennies and bought Donita Reeve's RulerMate (click on machine accessories in the left hand column). let me tell you...i wish i had gotten it sooner....i love it! it screws to the base of my machine making a nice study base for ruler work....i leave it on all the time....i don't even notice it anymore...and to be honest- my outlining of applique improved just by changing my base...you're only as good as your tools....
second, i use what i call a 'appli-key' it is basically an acrylic 'micro-drive' for my machine. it has all those cut outs that fit around my hopping foot perfectly. i use it in the 'push/pull way' that means i push against my hopping foot with the key, while i pull my machine's handles. it takes alot of PPP, but you'll get a good balance and have better control of your machine. (this one is also from Donita Reeve....click on rulers/templates. she calls it an Appli-guide)
(i want to add this: depending on the quilt and my mood- i might actually dig out and attach my microdrive handles)
you can see where i came up to the bottom of the T and went over and around the top and where the edge of the T got close to the S, i just 'jumped' over and quilted around the S and so forth to the beginning of the word. (you can click on the pics for a larger view)
then i just came back under the letters, using my filler design to 'jump' from letter to letter, and then when i get back to where i started i just quilt back into the background with my quilting.....wha-la! the lazy way of SID- it's all camo-ed by the background filler....and i only have one or two S&S per pass.
it's amazing how resourceful you can be when your lazy.... *giggle*
(i did S&S for the inside of the Bs, As, Ps, Os, and Ds. i did not stitch the inside of the Es)
here's a shot of the whole quilt. you can see that there are alot of letters....
maybe i should say i quilted it 'smart' not lazy...yup, i like that better....i quilted it smart.


You are so SMART! I will have to remember that technique.
ReplyDeleteI love it. Definetly smart not lazy! And yes, I am one of those LAers who is terrified of applique. I never know what to do with it. ;0) K
ReplyDeleteI love that quilt...I am going to make one one day....thanks for all of the tips.
ReplyDeleteThis comment has been removed by a blog administrator.
ReplyDeleteDo you still use the Donita Reeve extended base?
ReplyDelete