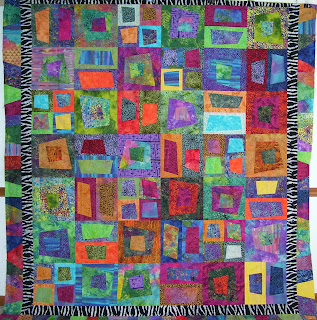
first some heads-up advice: these blocks are full of bias edges, so careful handling and pressing is required. if using normal quilting cotton, some spray starch before cutting out the sqs would not be a bad idea, in fact i recommend it. when pressing try to press only the seam you're pressing to avoid distorting the opposite edge. when planning your quilt, one block cut will equal one pieced block. so if you want 20 sqs in your quilt, you'll need to cut 20 sqs from fabrics. also, read through all the directions before beginning, it'll save you time and fabric...
also, this is a pick-your-own-size quilt block. for example, if you want 8" finished blocks in your quilt, you'll cut your squares 9 1/2" sq. so the simple math: add 1 1/2" to the finished size you want your blocks to be in the quilt. this will give us wiggle room.
fabric choices: chose fabrics that have high contrast. we will be pairing up sqs, and the contrast is what will give you a successful and visibly pleasing quilt top.
#1. cut out all your fabrics into the size you have determined. in my example i want 10" finished sqs, so i cut my fabrics into 12 1/2" sqs. pair up fabrics making sure there is HIGH contrast between the two. we will be working with ONE pair at a time.

#2. lay both sqs on top of each other with right sides facing up. ( the right side of both sqs as laid on cutting mat will look at the ceiling) using a ruler and rotary cutter, make your first cut making sure that the angle is not too severe. in this picture it looks like i'm only cutting the one fabric, but the polka dot grey is directly under the cream one. i'm cutting both at the same time.
#3. reposition ruler and make the second cut. this cut can be at the same angle as the first cut, or opposite. personally i like the shape from cutting opposing angles.
#4. separate the two just cut sections from the center section. just slide them out of the way.

#5. cutting only the middle section, make two more angled cuts. you should have something that looks like this.
#6. separate the two fabrics from each other making sure you keep the orientation of the pieces. we will be sewing them back together exactly as they lay. place alternating fabrics in the centers. remember the edges are bias, so handle carefully.
#7. sew the pieces back together in the OPPOSITE way we've cut them. for example, the last cut will be your first seam. this is the cool part: because we cut the beginning sq bigger than we needed, we have wiggle room with the seam allowances! they don't have to be exactly 1/4". after sewing the middle section, if your edge looks like the photo, that's ok! lay the next piece on top of it making sure you have fabric in your seam allowance.

#8. now you will have two pieced blocks that look like this. i call them opposite twins because the blocks are exactly the same, but the fabrics are in opposite places.

#9. now using a ruler, trim your blocks down to the size you want them for the quilt. in my case, i trimmed them to 10 1/2" for a 10" sq finished block.
#10. i made two more and sewed them into a four patch to make a pillow.
#11. this is a quilt i made using this technique. it has small sqs, rectangles, and larger sqs with multiple 'rings' just make sure to add 1 1/2" to your block per ring you intend to piece. the larger sqs n the quilt with the mutliple rings were cut at 15" trimmed to 12 1/2" and use three fabrics per block. so with that particular block, for each triplet set of sqs, i got three blocks for the quilt with each fabric in each position: wonky sq, inner ring, outer ring.

#12. this is a quilt i made using a 'layer cake' (a stack of precut 10" sqs.) from moda. after using this technique, i trimmed them to 8 1/2" to finish at 8". the best thing about using the layer cake was there was very little waste.
i hope this was clear...have fun using this technique in your own quilt. if you make one, let me know and i'll feature it in a future blog post....happy stitchn...


Cool technique. I like it. Thanks for sharing. I always wondered how it was done.
ReplyDeleteKaren
That looks like a fun quilt to make...I may have to buy a layer cake just to try it out! You're just too good!!
ReplyDeleteNeat idea-I love the black and white border on the first quilt!
ReplyDeleteHi, enjoyed your tutorial for the wonky block. I love the color ways of the 2 that you made--particularly, the darker one with the black and white border.
ReplyDeleteThanks for sharing. I have linked to you on my freebies blog...hugs Khris
ReplyDeleteTHIS IS BRILLIANT!!! I saw it on Khris' blog (thanks Khris!) and came over to see the tutorial - I love wonky (I do wonky better than I do accurate, lol) and I love scrappy - this is my kind of design!
ReplyDeleteThanks for sharing, I Saw in the blog de Khris!!
ReplyDeletekisses for you from Argentina ♥
Thanks for the tutorial--it looks like a fun quilt to try!! All kinds of mix and match combinations come to mind!!
ReplyDeleteDeb from clutteredquilter.blogspot.com
I love wonky square log cabins, I wish I could quilt to make this but I've made knitted versions several times!
ReplyDeleteThis is such a neat technique! I can't wait to try it! Thanks for sharing (and making it so easy to understand)!!!
ReplyDelete